Create a second warehouse
A warehouse is a physical building or space where items are stored. In Juniper, it is possible to set up multiple warehouses and transfer stored items between them.
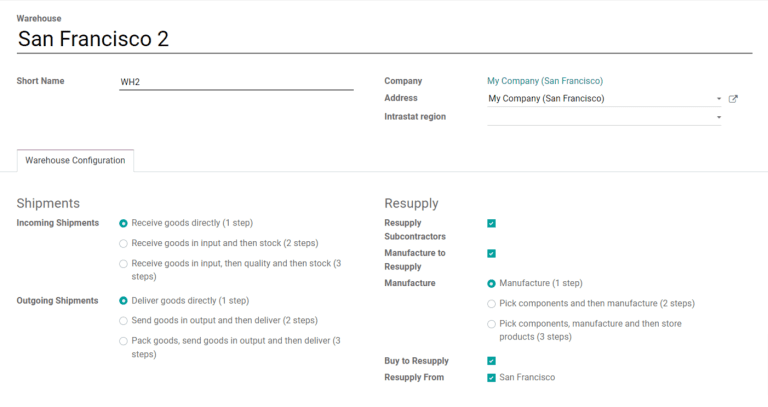
By default, the Juniper platform has one warehouse that is already configured, with the address set as the company’s address. To create a second warehouse, select , then click Create and configure the form as follows:
Warehouse: the full name of the warehouse
Short Name: the abbreviated code by which the warehouse is referred to; the short name for the default warehouse in Juniper is WH
Company: the company that owns the warehouse; this can be set as the company that owns the Juniper database or the company of a customer or vendor
Address: the address where the warehouse is located
Important
The options below will only appear if the Multi-Step Routes checkbox is enabled in under the Warehouse heading. For more information about routes and how they work in Juniper, see Using Routes and Pull/Push Rules.
Incoming/Outgoing Shipments: select the routes that incoming and outgoing shipments should follow
Resupply Subcontractors: allow subcontractors to be resupplied from this warehouse
Manufacture to Resupply: allow for items to be manufactured in this warehouse
Manufacture: select the route that should be followed when manufacturing goods inside the warehouse
Buy to Resupply: check the box to allow for purchased products to be delivered to the warehouse
Resupply From: select warehouses that can be used to resupply the warehouse being created

Important
Creating a second warehouse will automatically enable the Storage Locations setting, which allows location tracking of products within a warehouse. To toggle this setting, navigate to and click the checkbox under the Warehouse heading.
After filling out the form, click Save and the new warehouse will be created.
Add inventory to a new warehouse
If a new warehouse is created that has existing inventory in it, the inventory counts should be added to Juniper so that the stock listed in the Juniper database reflects what is in the physical warehouse. To add inventory to a new warehouse, navigate to , and then click Create. The inventory adjustment form can then be filled out as follows:
Inventory Reference: the name or code that the inventory adjustment can be referred to by
Locations: the location(s) where the inventory is stored; include the new warehouse and any locations within it that inventory will be added to
Products: include all products that will be added to inventory or leave blank to select any product during the next step
Include Exhausted Products: include products with a quantity of zero; does not affect inventory adjustments for new warehouses since they have no existing inventory
Accounting Date: the date used by accounting teams for bookkeeping related to the inventory
Company: the company that owns the inventory; can be set as the user’s company or as a customer or vendor
Counted Quantities: choose whether the counted quantities for products being added should default to stock on hand or zero; does not affect inventory adjustments for new warehouses since they have no existing inventory

Once the form is properly configured, click on Start Inventory to be taken to the next page where products can be added to the inventory adjustment. Add a new product by clicking on Create and then fill out the product line as follows:
Product: the product being added to inventory
Location: the location where the product is currently stored in the new warehouse; this can be set as the overall warehouse or a location within the warehouse
Lot/Serial Number: the lot that the product belongs to or the serial number used to identify it
On Hand: the total quantity of the product stored in the location for which inventory is being adjusted; this should be zero for a new location or warehouse
Counted: the amount of the product that is being added to inventory
Difference: the difference between the On Hand and Counted values; this will automatically update to reflect the value entered in the Counted column
UoM: the unit of measure used for counting the product

After adding all the products already stored in the new warehouse, click Validate Inventory to complete the inventory adjustment. The values in the On Hand column will update to reflect those in the Counted column and the products added will appear in the inventory of the new warehouse.