Getting started
The Juniper Marketing Automation app automates a variety of marketing tasks, by combining specific rules and filters to generate timed actions. Instead of manually having to build each stage of a campaign (such as a series of timed massmails), the Marketing Automation app allows marketers to build the entire campaign, and all of its stages, in one place on a single dashboard.
Create a campaign
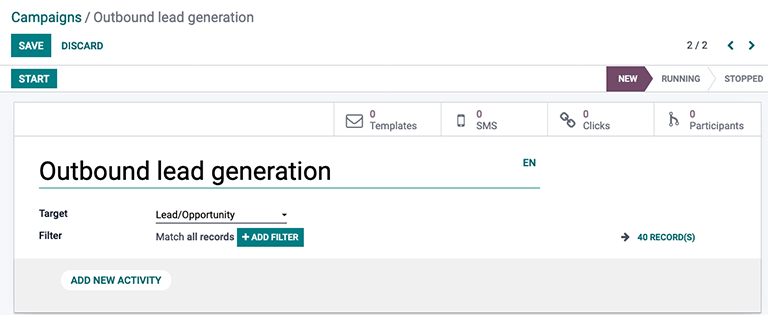
To create a new automated marketing campaign, open the app, and click the Create button in the upper-left corner. Doing so reveals a blank marketing automation campaign detail form on a separate page.
On the blank marketing automation campaign page, the following smart buttons and fields are available:

Smart buttons
Templates: represents the number of pre-configured mail templates being used in this particular campaign. (Templates can always be created on-the-fly, as well).
SMS: represents the number of personalized SMS messages connected to this campaign.
Clicks: represents the number of times attached links have been clicked by recipients of this campaign.
Participants: represents the number of contacts that have directly participated in this campaign.
Fields
Name: represents the name of the marketing automation campaign being created.
Target: this field is a drop-down menu to choose which model is targeted by this campaign (i.e., by Contacts, Sales Order, Lead/Opportunity, etc.).
Filter: this field provides numerous configurable criteria that can be used to further narrow down the target recipients/audience for the marketing automation campaign.
Campaign filters
To add a Filter to the target audience, click Add Filter, and a node field appears. In the node field, a custom equation can be configured for Juniper to use when filtering who to include (and exclude) in this specific marketing campaign.

When the first field of the node is clicked, a nested drop-down menu of options appears on the screen, wherein specific criteria is chosen based on needs of the campaign. The remaining fields on the node further define the criteria determining which records to include (or exclude) in the execution of the campaign.
To add another node, click the ➕ (plus sign) icon to the right of the filtering rule. To add a branch of multiple nodes at the same time, click the ⋯ (ellipses) icon.
For further information on filters, refer to this documentation page.
Note
Records represent the number of contacts in the system that fit the specified criteria for a campaign.