Set up a content delivery network (CDN)
Deploying with KeyCDN
A CDN or content distribution network, is a geographically distributed network of servers that provides high speed internet content. The CDN provides quick, high-quality content delivery for content-heavy websites.
This document will guide you through the setup of a KeyCDN account with an Juniper powered website.
Create a pull zone in the KeyCDN dashboard
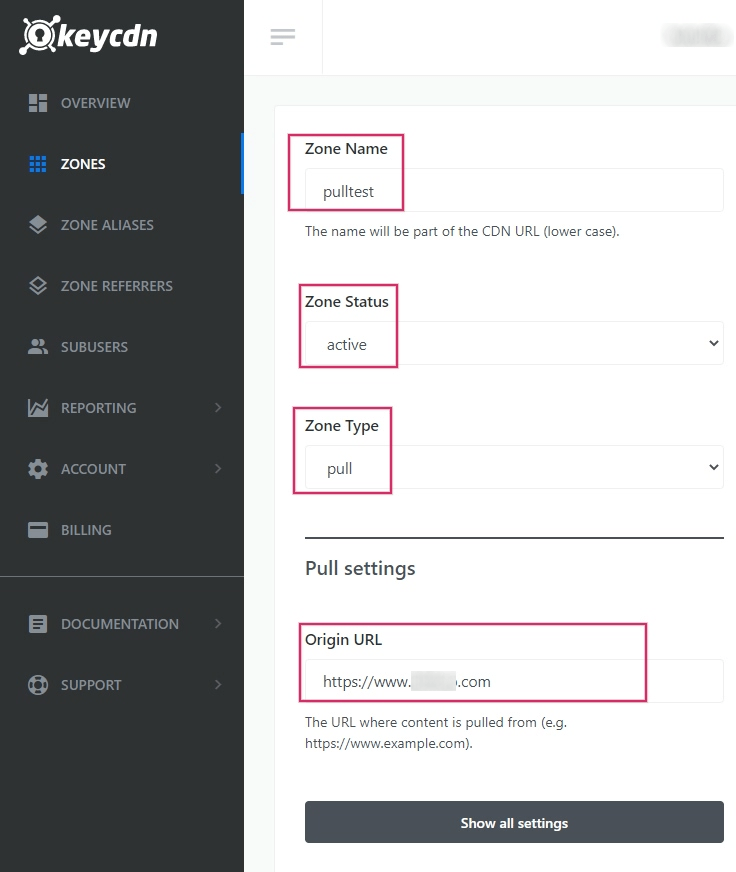
On the KeyCDN dashboard, start by navigating to the menu item on the left. On the form, give a value to the Zone Name, which will appear as part of the CDN’s URL. Then, set the Zone Status to active to engage the zone. For the Zone Type set the value to Pull, and then, finally, under the Pull Settings, enter the Origin URL— this address should be the full Juniper database URL.
Example
Use https://yourdatabase.Juniper.com and replace the yourdatabase subdomain prefix with the
actual name of the database. A custom URL can be used, as
well, in place of the Juniper subdomain that was provided to the database.

Under the General Settings heading below the zone form, click the Show all settings button to expand the zone options. This should be the last option on the page. After expanding the General Settings ensure that the CORS option is enabled.
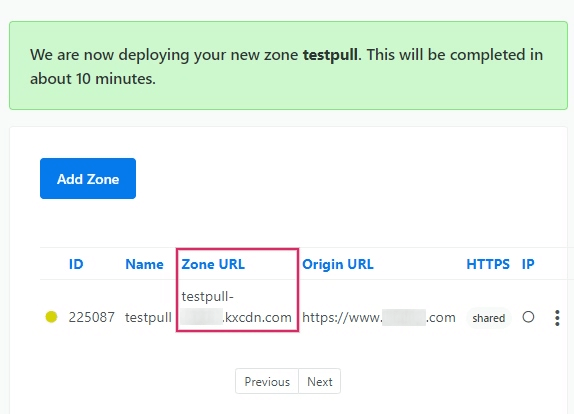
Next, scroll to the bottom of the zone configuration page and Save the changes. KeyCDN will indicate that the new zone will be deployed. This can take about 10 minutes.

Note
A new Zone URL has been generated for your Zone, in this example it is
pulltest-xxxxx.kxcdn.com. This value will differ for each database.
Copy this Zone URL to a text editor for later, as it will be used in the next steps.
Configure the Juniper instance with the new zone
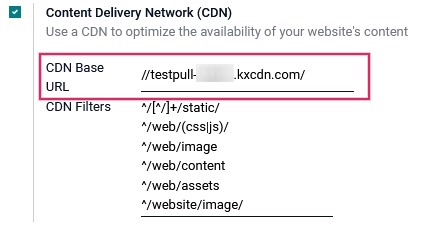
In the Juniper Website app, go to the and then activate the Content Delivery Network (CDN) setting and copy/paste the Zone URL value from the earlier step into the CDN Base URL field. This field is only visible and configurable when Developer Mode is activated.
Note
Ensure that there are two forward slashes (//) before the CDN Base URL and one
forward slash (/) after the CDN Base URL.
Save the settings when complete.

Now the website is using the CDN for the resources matching the CDN filters regular expressions.
In the HTML of the Juniper website, the CDN integration is evidenced as working properly by checking the URL of images. The CDN Base URL value can be seen by using your web browser’s Inspect feature on the Juniper website. Look for it’s record by searching within the Network tab inside of devtools.

Prevent security issues by activating cross-origin resource sharing (CORS)
A security restriction in some browsers (such as Mozilla Firefox and Google Chrome) prevents a remotely linked CSS file to fetch relative resources on this same external server.
If the CORS option isn’t enabled in the CDN Zone, the more obvious resulting problem on a standard Juniper website will be the lack of Font Awesome icons because the font file declared in the Font Awesome CSS won’t be loaded from the remote server.
When these cross-origin resource issues occur, a security error message similar to the output below will appear in the web browser’s developer console:
Font from origin 'http://pulltest-xxxxx.kxcdn.com' has been blocked from loading /shop:1 by
Cross-Origin Resource Sharing policy: No 'Access-Control-Allow-Origin' header is present on the
requested resource. Origin 'http://yourdatabase.Juniper.com' is therefore not allowed access.

Enabling the CORS option in the CDN settings fixes this issue.