Theming
After your development environment is fully set up, you can start building the skeleton of your theme module. In this chapter, you will discover how to:
Enable/disable the Website Builder’s standard options and templates.
Define the colors and fonts to use for your design.
Get the most out of Bootstrap variables.
Add custom styles and JavaScript.
Theme module
Juniper comes with a default theme that provides minimal structure and layout. When you create a new theme, you are extending the default theme.
Remember to add the directory containing your module to the addons-path command-line argument
when running Juniper in your development environment.
Technical naming
The first step is to create a new directory.
website_airproof
Note
Prefix it with website_ and use only lowercase ASCII alphanumeric characters and underscores.
In this documentation, we will use Airproof (a fictional project) as an example.
File structure
Themes are packaged like any Juniper module. Even if you are designing a basic website, you need to package its theme like a module.
website_airproof
├── data
├── i18n
├── lib
├── static
│   ├── description
│   ├── fonts
│   ├── image_shapes // Shapes for images
│   ├── shapes // Shapes for background
│   └── src
│       ├── img
│       │   ├── content // For those used in the pages of your website
│       │   └── wbuilder // For those used in the builder
│       ├── js
│       ├── scss
│       └── snippets // custom snippets
├── views
├── __init__.py
└── __manifest__.py
Folder |
Description |
|---|---|
data |
Presets, menus, pages, images, shapes, … ( |
i18n |
Translations ( |
lib |
External libraries ( |
static |
Custom assets ( |
views |
Custom views and templates ( |
Initialization
An Juniper module is also a Python package with a __init__.py file containing import
instructions for various Python files in the module. This file can remain empty for now.
Declaration
An Juniper module is declared by its manifest file. This file declares a Python package as an Juniper
module and specifies the module’s metadata. It must at least contain the name field, which is
always required. It usually contains much more information.
/website_airproof/__manifest__.py¶{
'name': 'Airproof Theme',
'description': '...',
'category': 'Website/Theme',
'version': '15.0.0',
'author': '...',
'license': '...',
'depends': ['website'],
'data': [
# ...
],
'assets': {
# ...
},
}
Field |
Description |
|---|---|
name |
Human-readable name of the module (required) |
description |
Extended description of the module, in reStructuredText |
category |
Classification category within Juniper |
version |
Juniper version this module is addressing |
author |
Name of the module author |
license |
Distribution license for the module |
depends |
Juniper modules must be loaded before this one, either because this module uses features they create or because it alters resources they define |
data |
List of XML files |
assets |
List of SCSS and JS files |
Note
To create a website theme, you only need to install the Website app. If you need other apps (Blogs, Events, eCommerce, …), you can also add them.
Default options
First, try to construct your theme by using Juniper’s default options. This ensures two things:
You do not re-invent something which already exists. For example, as Juniper provides an option to add a border on the footer, you shouldn’t recode it yourself. Instead, enable the default option first, then extend it if needed.
The user can still use all of Juniper’s features with your theme. For example, if you recode the border on the footer, you may break the default option or make it useless, giving the user a bad experience. Also, your recode might not work as well as the default option, as other Juniper features may rely on it.
Tip
Use four spaces per indentation level.
Do not use tabs.
Never mix spaces and tabs.
See also
Juniper variables
Juniper declares many CSS rules, most entirely customizable by overriding the related SCSS variables.
To do so, create a primary_variables.scss file and add it to the _assets_primary_variables
bundle.
Declaration
/website_airproof/__manifest__.py¶'assets': {
'web._assets_primary_variables': [
('prepend', 'website_airproof/static/src/scss/primary_variables.scss'),
],
},
By reading the source code, variables related to options are easily noticeable.
<we-button title="..."
   data-name="..."
   data-customize-website-views="..."
   data-customize-website-variable="'Sidebar'"
   data-img="..."/>
These variables can be overridden through the $o-website-value-palettes map, for example.
Global
Declaration
/website_airproof/static/src/scss/primary_variables.scss¶$o-website-values-palettes: (
(
// Templates
// Colors
// Fonts
// Buttons
// ...
),
);
Tip
That file must only contain definitions and overrides of SCSS variables and mixins.
See also
Fonts
You can embed any font on your website. The Website Builder automatically makes them available in the font selector.
Declaration
/website_airproof/static/src/scss/primary_variables.scss¶$o-theme-font-configs: (
<font-name>: (
'family': <css font family list>,
'url' (optional): <related part of Google fonts URL>,
'properties' (optional): (
<font-alias>: (
<website-value-key>: <value>,
...,
),
...,
)
)
Use
/website_airproof/static/src/scss/primary_variables.scss¶$o-website-values-palettes: (
(
'font': '<font-name>',
'headings-font': '<font-name>',
'navbar-font': '<font-name>',
'buttons-font': '<font-name>',
),
);
Google fonts
/website_airproof/static/src/scss/primary_variables.scss¶$o-theme-font-configs: (
'Poppins': (
'family': ('Poppins', sans-serif),
'url': 'Poppins:400,500',
'properties' : (
'base': (
'font-size-base': 1rem,
),
),
),
);
Custom fonts
First, create a specific SCSS file to declare your custom font(s).
/website_airproof/__manifest__.py¶'assets': {
'web.assets_frontend': [
'website_airproof/static/src/scss/font.scss',
],
},
Then, use the @font-face rule to allow you custom font(s) to be loaded on your website.
/website_airproof/static/src/scss/font.scss¶@font-face {
font-family: '<font-name>';
...
}
/website_airproof/static/src/scss/primary_variables.scss¶$o-theme-font-configs: (
'Proxima Nova': (
'family': ('Proxima Nova', sans-serif),
'properties' : (
'base': (
'font-size-base': 1rem,
),
),
),
);
Tip
It is recommended to use the .woff format for your fonts.
Colors
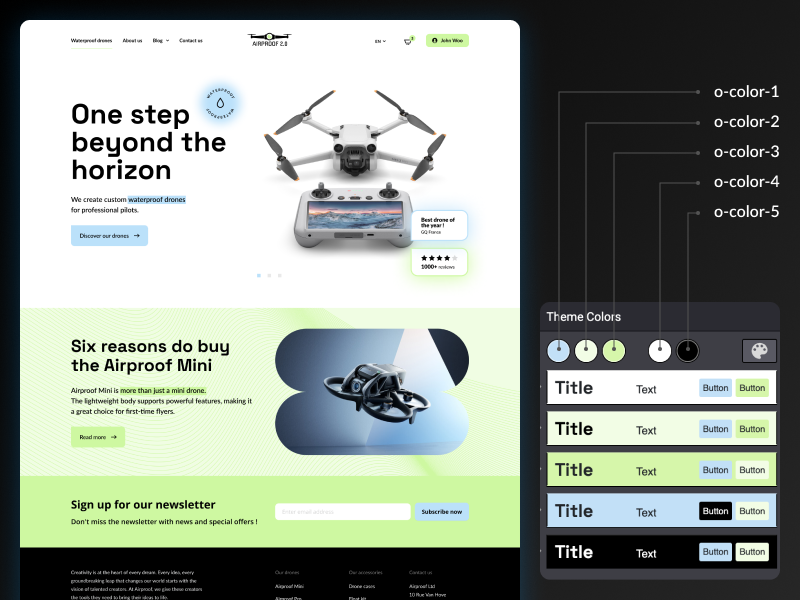
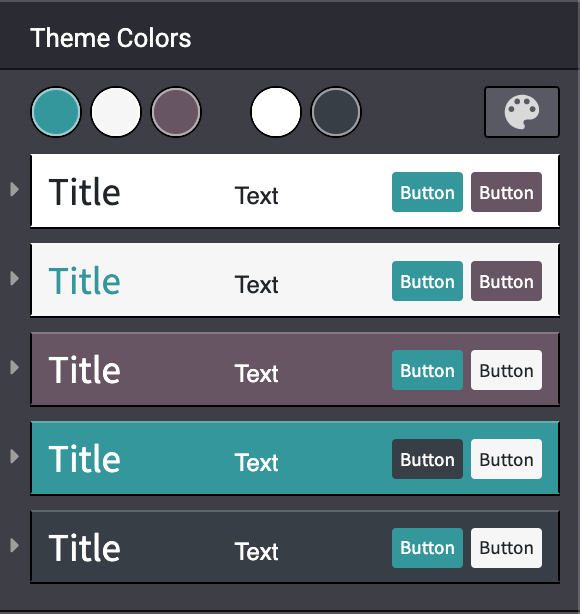
The Website Builder relies on palettes composed of five named colors. Defining those in your theme ensures it stays consistent.
Color |
Description |
|---|---|
o-color-1 |
Primary |
o-color-2 |
Secondary |
o-color-3 |
Extra |
o-color-4 |
Whitish |
o-color-5 |
Blackish |

Declaration
/website_airproof/static/src/scss/primary_variables.scss¶$o-color-palettes: map-merge($o-color-palettes,
(
'airproof': (
'o-color-1': #bedb39,
'o-color-2': #2c3e50,
'o-color-3': #f2f2f2,
'o-color-4': #ffffff,
'o-color-5': #000000,
),
)
);
Add the created palette to the list of palettes offered by the Website Builder.
$o-selected-color-palettes-names: append($o-selected-color-palettes-names, 'airproof');
Use
/website_airproof/static/src/scss/primary_variables.scss¶$o-website-values-palettes: (
(
'color-palettes-name': 'airproof',
),
);

Color combinations
Based on the previously defined five color palettes, the Website Builder automatically generates five color combinations, each defining a color for the background, text, headings, links, primary buttons, and secondary buttons. These colors can be customized later by the user.

The colors used in a color combination are accessible and can be overridden through the BS
$colors map using a specific prefix (o-cc for color combination).
/website_airproof/static/src/scss/primary_variables.scss¶$o-color-palettes: map-merge($o-color-palettes,
(
'airproof': (
'o-cc*-bg': 'o-color-*',
'o-cc*-text': 'o-color-*',
'o-cc*-headings': 'o-color-*',
'o-cc*-h2': 'o-color-*',
'o-cc*-h3': 'o-color-*',
'o-cc*-h4': 'o-color-*',
'o-cc*-h5': 'o-color-*',
'o-cc*-h6': 'o-color-*',
'o-cc*-link': 'o-color-*',
'o-cc*-btn-primary': 'o-color-*',
'o-cc*-btn-primary-border': 'o-color-*',
'o-cc*-btn-secondary': 'o-color-*',
'o-cc*-btn-secondary-border': 'o-color-*',
),
)
);
Note
For each o-cc*, replace the * with the digit (1 - 5) corresponding to the desired color
combination.
The default text color is o-color-5. If the background is too dark, it will automatically
change to the o-color-4 color.
See also
Demo page
The Website Builder automatically generates a page to view the color combinations of the theme color palette: http://localhost:8069/website/demo/color-combinations
Bootstrap variables
Juniper includes Bootstrap by default. You can use all variables and mixins of the framework.
If Juniper does not provide the variable you are looking for, there could be a Bootstrap variable that allows it. Indeed all Juniper layouts respect Bootstrap structures and use Bootstrap components or their extensions. If you customize a Bootstrap variable, you add a generic style for the whole user website.
Use a dedicated file added to the _assets_frontend_helpers bundle to override Bootstrap
values and not the primary_variables.scss file.
Declaration
/website_airproof/__manifest__.py¶'assets': {
'web._assets_frontend_helpers': [
('prepend', 'website_airproof/static/src/scss/bootstrap_overridden.scss'),
],
},
Use
/website_airproof/static/src/scss/bootstrap_overridden.scss¶// Typography
$h1-font-size: 4rem !default;
// Navbar
$navbar-nav-link-padding-x: 1rem!default;
// Buttons + Forms
$input-placeholder-color: o-color('o-color-1') !default;
// Cards
$card-border-width: 0 !default;
Tip
That file must only contain definitions and overrides of SCSS variables and mixins.
Warning
Don’t override Bootstrap variables that depend on Juniper variables. Otherwise, you might break the possibility for the user to customize them using the Website Builder.
See also
Views
For some options, in addition to the Website Builder variable, you also have to activate a specific view.
By reading the source code, templates related to options are easily found.
<we-button title="..."
   data-name="..."
   data-customize-website-views="website.template_header_default"
   data-customize-website-variable="'...'"
   data-img="..."/>
<template id="..." inherit_id="..." name="..." active="True"/>
<template id="..." inherit_id="..." name="..." active="False"/>
Example
Changing the menu items’ horizontal alignment
/website_airproof/data/presets.xml¶<record id="website.template_header_default_align_center" model="ir.ui.view">
<field name="active" eval="True"/>
</record>
The same logic can be used for others Juniper apps as well.
eCommerce - Display products categories
<record id="website_sale.products_categories" model="ir.ui.view">
   <field name="active" eval="False"/>
</record>
Portal - Disable the language selector
<record id="portal.footer_language_selector" model="ir.ui.view">
   <field name="active" eval="False"/>
</record>
Assets
For this part, we will refer to the assets_frontend bundle located in the web module. This bundle
specifies the list of assets loaded by the Website Builder, and the goal is to add your SCSS and JS
files to the bundle.
Styles
The Website Builder together with Bootstrap are great for defining the basic styles of your website. But to design something unique, you should go a step further. For this, you can easily add any SCSS file to your theme.
Declaration
/website_airproof/__manifest__.py¶'assets': {
'web.assets_frontend': [
'website_airproof/static/src/scss/theme.scss',
],
},
Feel free to reuse the variables from your Bootstrap file and the ones used by Juniper in your
theme.scss file.
Example
/website_airproof/static/src/scss/theme.scss¶ blockquote {
border-radius: $rounded-pill;
color: o-color('o-color-3');
font-family: o-website-value('headings-font');
}
Interactivity
Juniper supports three different kinds of JavaScript files:
plain JavaScript files (no module system),
Juniper modules (using a custom module system).
Most new Juniper JavaScript codes should use the native JavaScript module system. It’s simpler and brings the benefit of a better developer experience with better integration with the IDE.
Important
Juniper needs to know which files should be translated into Juniper modules and which files should not. It’s an opt-in system: Juniper looks at the first
line of a JavaScript file and checks if it contains the string @Juniper-module. If so,
it will automatically be converted to an Juniper module.
/** @Juniper-module **/
Declaration
/website_airproof/__manifest__.py¶'assets': {
'web.assets_frontend': [
'website_airproof/static/src/js/theme.js',
],
},
Note
If you want to include files from an external library, you can add them to the /lib
folder of your module.
Tip
Use a linter (JSHint, …).
Never add minified JavaScript libraries.
Add
'use strict';on top of every Juniper JavaScript module.Variables and functions should be camelcased (
myVariable) instead of snakecased (my_variable).Do not name a variable
event; useev.instead. This is to avoid bugs on non-Chrome browsers, as Chrome is magically assigning a global event variable (so if you use the event variable without declaring it, it will work fine on Chrome but crash on every other browser).Use strict comparisons (
===instead of==).Use double quotes for all textual strings (such as
"Hello") and single quotes for all other strings, such as a CSS selector.x_nav_item.Always use
this._super.apply(this, arguments).